# VirtuKiosk A1
# Release Notes
# VirtuKiosk - Version 12.2
**Release Date -** 23rd May 2026
# VirtuKiosk - Version 12.3
**Release Date:** 19 June 2026
# Overview
Version **12.3** introduces new features, UI improvements, and bug fixes to enhance the kiosk experience.
## Features
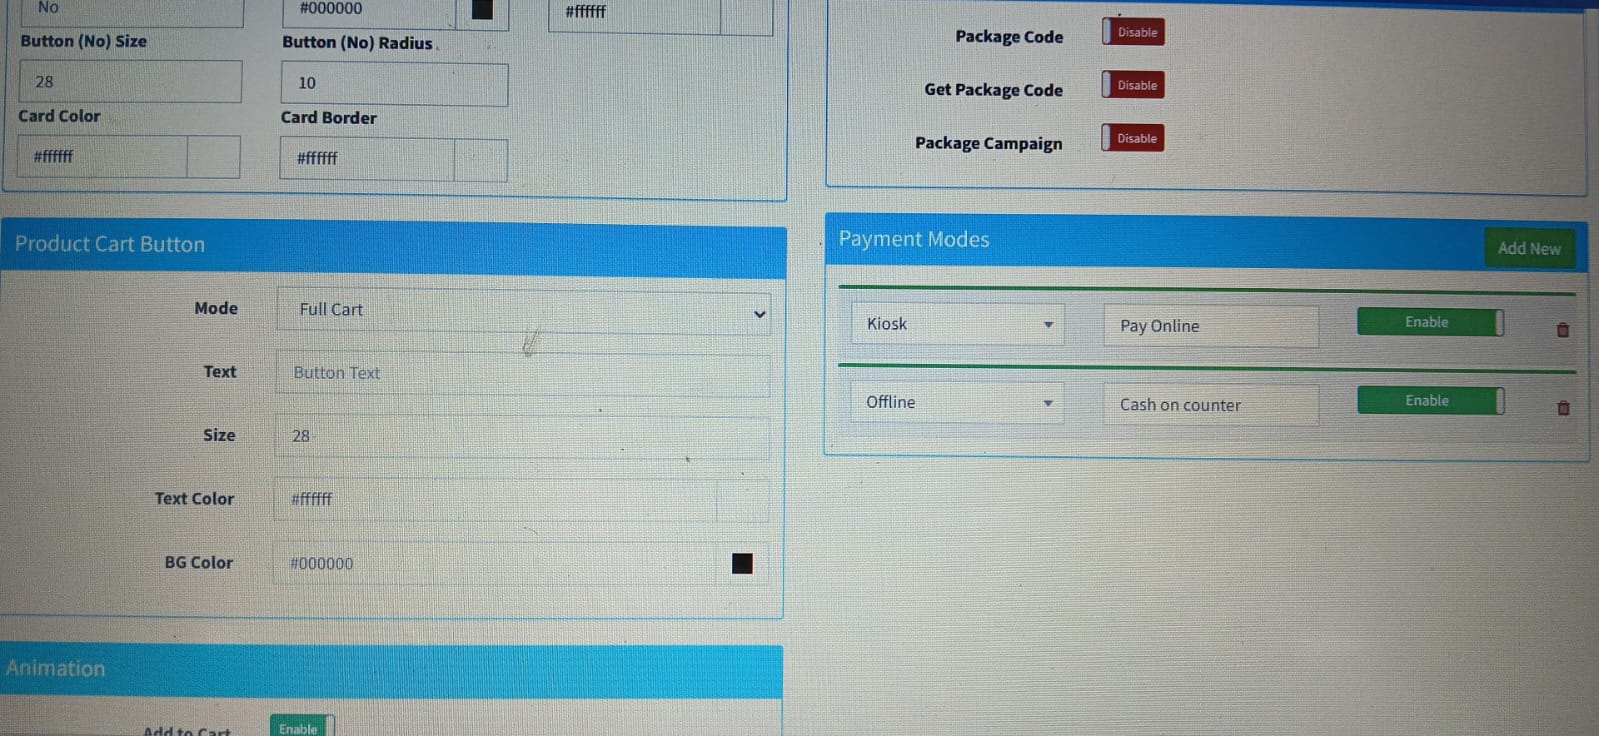
### 1. Payment Mode on Kiosk
Added support for **Offline Payment Mode**, allowing customers to place orders using **Cash Payment** directly through the kiosk.
The **Payment Mode** can be enabled by navigating to:
**Modules → Order → Order Settings → Payment Modes**
For detailed configuration, refer to the **[Payment Mode](/link/94#bkmrk-payment-mode)** documentation.
> **Note:**
> - **Kiosk** – Supports online payments.
> - **Offline** – Supports cash payment.
---
### 2. RFID Scanner Support
Introduced support for **RFID Scanners**, enabling seamless RFID tag scanning and identification for supported kiosk workflows.
---
## Enhancements
### Updated Cart Page UI
The **Cart Page** has been redesigned with a cleaner and more intuitive interface, providing an improved user experience and easier navigation.
---
## Bug Fixes
### Cart Page Back Button Issue
Resolved an issue where the **Back** button on the Cart Page was not functioning correctly. The button now navigates as expected.
# VirtuKiosk - Version 12.4
**Release Date:** 26 June 2026
# Overview
Version **12.4** focuses on improving kiosk configuration and administrative controls. This release introduces enhancements to bulk product management, environment settings, scheduler configuration, RFID scanner setup, and floating button navigation, making kiosk management more efficient and customizable.
---
## Features
### 1. Bulk Actions Enhancement – Add Product Attributes
Bulk Actions have been enhanced to support **Product Attributes**, allowing administrators to add or update attributes for multiple products simultaneously. This helps reduce manual effort and improves product management efficiency.
---
### 2. Default Font & Pixel Size Configuration
A new configuration has been added to the **Environment API**, allowing administrators to define the default **Font** and **Pixel Size** for the kiosk interface.
#### Benefits
- Consistent text styling across the kiosk.
- Easier customization through environment configuration.
- Reduces the need for manual font adjustments.
---
### 3. Scheduler Configuration Enhancement
The Scheduler has been improved to allow both **Active Time** and **Inactive Time** to be configured together.
#### Benefits
- Configure kiosk operating hours in a single place.
- Better scheduling and automation.
- Simplified kiosk availability management.
---
### 4. RFID Scanner Configuration
Added a dedicated **RFID Scanner Configuration** section to simplify RFID setup and management.
#### Benefits
- Easy RFID scanner configuration.
- Improved compatibility with supported RFID devices.
- Centralized RFID settings.
---
### 5. Back Stack Configuration for Floating Button
Added a new **Back Stack Configuration** option for the kiosk floating button.
This allows administrators to configure the floating button's back navigation behavior, providing better control over the user navigation flow within the kiosk.
---
# VirtuKiosk - Version 12.5
**Release Date -** 10th July 2026
# Overview
Version 12.5 release includes improvements to **Maps, Floating Buttons, Product CTA, Script Commands, and Web Cache handling**. It also introduces new map filtering and sorting capabilities along with updates to navigation behavior.
## Release Updates
### Maps
#### Map Filtering & Search
- Added the initial version of **Map List Filterable**.
- Updated the **Map Item Filter** search UI.
- Updated the default value for **Map Filterable**.
#### Map Sorting
- Added sorting of map items by **Rank** and **Title**.
#### Map UI Improvements
- Increased the size of **Map Pins** and **Footer** for improved visibility.
**Related Areas:** Maps
---
### Floating Buttons & Product CTA
#### Take Me There
- Added support for the following Floating Button types:
- `map_take_me_there`
- `product_cta_takemethere`
- Fixed the **Floating Button Product CTA – Take Me There** issue.
**Related Ticket:** #646
---
### Script Commands
#### Product Take Me There
- Added support for direct navigation to **Product Take Me There**.
- Updated the **Open Product Take Me There** script command:
- Removed navigation behavior.
- Added `show_maps` functionality.
---
### Web Cache
#### Cache Management
- Updated the **Web Cache Clean** logic for improved cache handling.
---
# VirtuKiosk - Version 12.6
**Release Date** - 28th July 2026
# Overview
Version 12.6 release includes improvements to **Screensaver handling, Demo configuration, and Pick & Learn sensor support**.
## Release Updates
### Pick & Learn
#### Sensor Support
- Added **sensor support** for Pick & Learn functionality.
---
### Screensaver
#### Background Activity
- Updated the Screensaver background activity to properly clear the background.
---
### Demo Configuration
#### Configuration Logs
- Removed unnecessary **Demo Configuration logs** from the Android Kiosk application.
---
# VirtuKiosk - Version 12.7
**Release Date-** 13th August 2026
# Overview
Version **12.7** includes the addition of the **Aadhaar Server (kiosk.uidai.local)** to the Android Kiosk application. No other functional changes or feature updates were included in this release.
## New Update
### Aadhaar Server
- Added **Aadhaar Server** support to the Android Kiosk application.
- Added **kiosk.uidai.local**
# VirtuKiosk - Version 12.8
**Release Date -** 25th August 2026
# Overview
Version 12.8 includes updates to **Media Files, Product Mode, backend-controlled script loading**. It also introduces new media customization capabilities **(Previous & Next Button)** and fixes an issue affecting the Update App flow.
## New Updates
### Media Files
#### Videos & Gallery
- Added **Unmute configuration** for Media File Videos and Gallery.
- Added **Media File Videos** and **Media File Gallery** support in Product Mode.
- Added UI customization for Media File **Images, Videos, and Gallery**, including **Previous and Next button controls**.
- The Previous and Next button background is automatically hidden when the **Content Background Opacity** is less than `1`.
##### Media Type Behavior
- **Media Images** – Displays only image files.
- **Media Videos** – Displays only video files.
- **Media Gallery** – Displays both image and video files.
#### Access Path
- To access the Media File UI customization:
**Pages → Select Product → Info → Select Mode → Media files Images, Videos & Gallery**
- To Add media Files(Images, Videos):
**Modules → Files → Add Files**
- To add all Media Files in Product Mode:
**Select Particular Product → File → Media File → Add Media Files**
- To change the Customization of Previous & Next Buttons:
**Product → Select Product → Settings → Style**
#### Style Settings
The **Style** section provides options to customize the **Previous** and **Next** Button buttons:
- **Content Background Color** – Changes the background color of the Previous and Next buttons.
- **Content Background Opacity** – Controls the opacity of the Previous and Next button.
**Related Ticket:** #645
---
### Bug Fixes
#### Update App Crash
- Fixed an issue where the Android Kiosk application crashed when clicking **Update App** from the error/update screen.
**Related Ticket:** #698
---
### Backend & Script Handling
#### Base URL Script Loading
- Updated script loading logic to use the **Base URL** controlled by the backend.
#### Access Path
**VirtuKiosk → Kiosk Settings → Config → Script Base URL**
**Related Ticket:** #696
#### Intercept URL Script Command
- Added support for the **Intercept URL** script command in Android Kiosk.
# VirtuKiosk - Version 12.9
**Release Type:** Bug Fixes & Improvements
**Release Date:** 27th August, 2026
---
# Overview
Version **12.9** includes bug fixes and improvements related to **Media File Mode, package price visibility, and CSN printer support**.
---
## Changes & Fixes
### 1. Media Files Mode – Previous/Next Button Blinking Issue Fixed
**Issue:** `#706`
**Changes:**
- Fixed **Previous/Next** navigation buttons displayed when only a single media file is available
- When only a single media item is available, navigation buttons behave correctly.
---
### 2. Search Bar Visibility – Media Files Black Screen Issue
**Issue:** `#707`
- Navigate to **Left Sidebar → VirtuKiosk → Kiosk Settings → Search Bar Visibility** and enable the **Search Bar Visibility** option.
- Open a product containing **media files**.
- When the **Search Bar** was clicked, the media files area displayed as **black screen**.
- Fixed the issue so that media files are displayed correctly when **Search Bar Visibility** is enabled.
---
### 3. Package Price Visibility Fix
**Issue:** `#703`
Updated the price visibility for product → packages
The package price will be hidden when:
```text
Package Price = 0
```
---
### 4. CSN Printer linespace support added through Script
**Commit:** `#701`
- Added **line spacing support** for the CSN printer.
- Line spacing can now be configured through the **script**.
- The required amount of space between printed lines can be managed based on the printing requirements.
- This provides better control over the spacing and formatting of the printed output.
#### How to add Script
- **Leftside bar → Modules → Add Script**
# VirtuKiosk - Version 13.0
**Release Date - 2nd September, 2026**
# Overview
Version **13.0** includes an API version update for the Android Kiosk, upgrading the API integration from **v2** to **v2.1**.
---
## Changes & Fixes
### Android Kiosk API Version Updated
**Issue:** `#709`
- Updated the Android Kiosk API version from **v2** to **v2.1**.
- Updated the API integration to use the latest **v2.1** version.
---
## Release Summary
| Issue | Commit | Change |
|---|---|---|
| #709 | `b688bfe9f` | Updated Android Kiosk API version from v2 to v2.1 |
# VirtuKiosk - Version 13.1
**Release Notes - 30th September, 2026**
# Overview
Version **13.1** introduces major enhancements to **3D Navigation**, allowing **3D Navigation to run directly on the Kiosk**.
The update includes **2D to 3D map conversion**, **3D shapes**, **GLB models**, **navigation configuration**, **product mapping**, and **Kiosk mapping**.
## 3D Navigation Enhancements
| Feature | Description |
|---|---|
| **2D to 3D Conversion** | Maps can be converted from **2D mode to 3D mode** for 3D Navigation. |
| **3D Navigation on Kiosk** | 3D Navigation can now run directly on the **Kiosk**. |
| **3D Shapes** | Navigation areas can be created and configured as 3D shapes. |
| **GLB Models** | GLB files can be uploaded and used for 3D navigation. |
| **Shape Configuration** | Shape title, logo, 3D pin, rotation, scale, color, and height can be configured. |
| **Product Mapping** | Products can be mapped to configured 3D navigation areas. |
| **Kiosk Mapping** | Configured 3D Navigation can be mapped to the Kiosk. |
### 3D Navigation Flow
```text
2D Map
↓
Convert Map Mode: 2D → 3D
↓
Configure Map
↓
Create 3D Shapes
↓
Configure Shape & Coordinates
↓
Upload Logo / GLB Files
↓
Map Products
↓
Map Kiosk
↓
Run 3D Navigation on Kiosk
```
#### Access Path
- **Left Menu Bar → Modules → Navigation → Add Map → Config → Convert 2D to 3D Map → Shapes → Add / Manage / Delete Shapes → Add Logo & GLB Files → Kiosk → Kiosk Map → Product → Product Map**
#### Access Path to add logo & Glb Files
- **Left Menu Bar → Modules → Files**
##### Important
> **Map Mode must be changed from 2D to 3D in Config section from navigation module before configuring and testing 3D Navigation.**
#### Detailed Documentation Reference
For detailed information about **3D Navigation configuration, shapes, GLB files, map configuration, product mapping, and Kiosk mapping**, refer to the detailed documentation.
**Reference Documentation:**
- [3D Navigation Detailed Documentation ](https://docs.virtubox.io/books/virtukiosk-a1/page/3d-navigation)
##### Result
With **Version 13.1**, the Kiosk now supports a complete **3D Navigation experience**, including **2D to 3D conversion, 3D maps, shapes, GLB models, product mapping, and Kiosk navigation**.
# VirtuKiosk - Version 13.2
**Release Date - 07th October, 2026**
# Overview
Version **13.2** includes **bug fixes and improvements in 3D Navigation**, mainly related to **Shape Color Configuration** and **GLB File Loading**.
## 3D Navigation Bug Fixes
### 1. Shape Color Based on Drawing Direction
In previous versions, the shape color could be configured correctly only when the shape points were created in an **anticlockwise direction**.
- **Anticlockwise:** Custom shape color could be applied.
- **Clockwise:** Shape color was automatically changed to **black**.
### Fix in Version 13.2
In Version **13.2**, the shape color can now be configured regardless of the drawing direction.
- **Clockwise:** Custom color can be applied.
- **Anticlockwise:** Custom color can be applied.
> **Bug Fixed:** Shape color is no longer automatically changed to black based on the point drawing direction.
---
### 2. Shape Color Based on Number of Points
In previous versions, the shape color could be configured correctly only when the shape contained the expected number of points.
- With **4 points**, the custom color could be applied.
- With **more or fewer points**, the shape color could automatically change to **black**.
### Fix in Version 13.2
In Version **13.2**, the shape color can be configured regardless of the number of points.
- **4 points:** Custom color can be applied.
- **More than 4 points:** Custom color can be applied.
- **Fewer than 4 points:** Custom color can be applied.
> **Bug Fixed:** Shape color is no longer automatically changed to black based on the number of points.
---
## 3. GLB File Loading After New Build
Sometimes, after installing a **new build**, previously uploaded **GLB files may not load immediately**.
### Recommended Action
If the GLB files are already uploaded but are not visible or loaded after installing a new build:
1. Open the Kiosk where you have 3D Navigation enabled and GLB files uploaded.
2. Perform **Sync**.
3. Wait for the synchronization to complete.
4. Verify that the GLB files are loaded correctly.
> **Note:** If the GLB files are already uploaded but are not loading after a new build, **Sync should be performed first** to ensure that the files are loaded correctly.
## Summary
Version **13.2** improves 3D Navigation by fixing shape color issues related to:
- **Clockwise and anticlockwise point creation**
- **Different numbers of shape points**
- **GLB file loading after a new build**
# VirtuKiosk - Version 13.3
**Release Type** : Bug Fix
**Release Date** : 09th October, 2026
# Overview
Version **13.3** includes bug fixes and UI improvements to enhance the stability and user experience of **3D Navigation**.
## Bug Fixes
### 1. App Crash While Loading GLB Files
**Issue:** Previously, the app could crash when GLB files were uploaded or loaded in 3D Navigation.
**Fix:** The issue has been addressed in Version 13.3 to improve app stability while handling GLB files.
### 2. Random App Crash While Moving Navigation
**Issue:** Previously, the app could crash randomly when the user moved or adjusted the 3D Navigation view, even by a small amount.
**Fix:** The issue has been addressed in Version 13.3 to improve stability while moving or adjusting 3D Navigation.
## UI Improvements
Version **13.3** also includes UI changes to improve the 3D Navigation experience.
## Result
Version **13.3** improves 3D Navigation stability by addressing crashes related to GLB files and navigation movement, along with UI improvements.
# VirtuKiosk - Version 13.4
**Release Type** : Bug Fix & Improvements
**Release Date** : 12th October, 2026
# Overview
Version **13.4** includes three important updates to **3D Navigation**, addressing UI issues, shape color configuration, and application stability.
## Bug Fixes and Improvements
### 1. Reset Option Missing in Vertical Mode
**Issue:**
Previously, when using the **Take Me There** feature in 3D Navigation on a vertical Kiosk, the **Reset** option was not displayed. This prevented users from accessing the reset functionality as expected.
**Fix in Version 13.4:**
The issue has been fixed, ensuring that the **Reset** option is available in vertical mode when using the Take Me There feature.
### 2. Shape Color Configuration with More Than Four Points
**Issue:**
In previous versions, users could apply a custom color to a shape only when it was created with exactly four points. When a shape contained more or fewer points, its color was automatically displayed as black.
**Fix in Version 13.4:**
The shape color configuration has been improved, allowing users to create shapes with **more than four points** and apply their preferred colors instead of the shape automatically appearing black.
### 3. Application Crash Issue
**Issue:**
An application crash issue was observed during the use of 3D Navigation, affecting the overall application stability.
**Fix in Version 13.4:**
The crash issue has been fixed to improve application stability and provide a smoother 3D Navigation experience.
## Result
Version **13.4** improves the 3D Navigation experience by fixing the missing Reset option in vertical mode, enhancing shape color configuration for shapes with more than four points, and resolving an application crash issue.
# VirtuKiosk - Version 13.5
**Release Type** : Bug Fix
**Release Date** : 13th October, 2026
# Overview
Version **13.5** includes a bug fix related to **GLB file visibility in 3D Navigation**. This update addresses an issue where uploaded GLB files were not displayed correctly, improving the overall 3D Navigation experience.
## Bug Fixes
### GLB Files Not Displaying in 3D Navigation
**Issue:**
In previous versions, GLB files uploaded through the backend were not appearing in 3D Navigation on the Kiosk. This issue affected the visibility of 3D models and prevented users from viewing the configured GLB assets as expected.
**Fix in Version 13.5:**
The issue has been fixed in Version **13.5**. Uploaded GLB files can now be displayed correctly in 3D Navigation, allowing users to view their configured 3D models on the Kiosk.
## Result
Version **13.5** improves the 3D Navigation experience by fixing the GLB file display issue and ensuring that uploaded 3D models are visible as expected.
# VirtuKiosk - Version 13.6
**Release Type** : Bug Fix & Improvements
**Release Date** : 13th October, 2026
# Overview
Version **13.6** introduces a new **Shape Label** feature in the backend for 3D Navigation. This update allows users to display shape titles and images, customize their appearance and positioning, and configure labels either individually for specific shapes or globally across all shapes.
Additionally, this version fixes an issue where unwanted rectangular backgrounds appeared behind shape titles and images.
## 1. New Feature: Shape Label Configuration
### Access Path
**Left Menu Bar → Modules → Navigation → Shape → Label**
### Description
The **Shape Label** feature allows users to display text and images on navigation shapes. Users can customize the label's position, size, color, rotation, and other display properties.
### Available Label Modes
| Mode | Description |
|---|---|
| **Shape / POI Logo** | Displays an image or logo on the shape or Point of Interest (POI). |
| **Shape Title** | Displays the shape title. |
| **POI / Shape Title** | Displays the POI or shape title. |
| **None** | Disables the label display. |
### Label Configuration Options
| Setting | Description |
|---|---|
| **Mode** | Selects the required label display mode. |
| **Text Color** | Sets the label text color. |
| **Text Size** | Defines the label text size. |
| **Text Border Color** | Sets the text border color. |
| **Text Border Size** | Defines the text border size. |
| **Box Center Coordinate** | Sets the X and Y coordinates for positioning the label. |
| **Box Rotation** | Adjusts the label rotation. |
| **Box Height** | Sets the label area's height in pixels. |
| **Box Width** | Sets the label area's width in pixels. |
### How to Configure Shape Labels
1. Open **Modules → Navigation** from the left menu bar.
2. Select the required map and shape.
3. Open the **Label** tab from Shape menu.
4. Select the desired label mode.
5. Configure the text or image display settings.
6. Adjust the position, size, color, border, and rotation as required.
7. Click **Update** to apply the changes.
## 2. Global Label Configuration
### Access Path
**Left Menu Bar → Modules → Navigation → Config → 3D Configuration → Label Mode**
### Description
The **Label Mode** option is also available in the **3D Configuration** section. It allows users to configure the label display mode globally across shapes.
If you want to display shape titles or images across all shapes, you can configure the appropriate Label Mode in the global 3D Configuration settings.
### Global Configuration Options
| Setting | Description |
|---|---|
| **Label Mode** | Selects the label display mode for global configuration. |
| **Label Text Color** | Sets the text color for labels. |
| **Label Text Border Color** | Sets the text border color for labels. |
### How to Configure Global Labels
1. Open **Modules → Navigation**.
2. Select the required map.
3. Open the **Config** section.
4. Navigate to **3D Configuration**.
5. Select the required **Label Mode**.
6. Configure the available label color settings.
7. Click **Save** to apply the configuration.
> **Note:** Use global Label Mode when you want a consistent label display across shapes. Use the individual Shape Label settings when you need to customize a specific shape.
## 3. Bug Fix: Unwanted Rectangular Background Behind Shape Labels or Shapes images
### Issue
Previously, when a shape title or image was displayed on a shape, an unwanted rectangular background appeared behind the label. This affected the visual appearance of shapes in 3D Navigation.
### Fix in Version 13.6
The issue has been fixed. Shape titles and images can now be displayed without the unwanted rectangular background, providing a cleaner appearance in 3D Navigation.
## Result
Version **13.6** enhances 3D Navigation by introducing customizable Shape Labels, providing global label configuration, and fixing the unwanted rectangular background issue. Users can configure labels individually or apply a consistent label mode globally according to their requirements.
# VirtuKiosk - Version 13.7
# Overview
Version **13.7** introduces bug fixes and usability improvements in **3D Navigation**, focusing on shape visibility when adding logos to tilted shapes and simplifying the Shape Label configuration process. These improvements enhance shape rendering and reduce the need for manual configuration.
## 1. Bug Fix: Shape Disappearing When Adding a Logo to a Tilted Shape
### Issue
Previously, when a shape was drawn with a tilt or rotation in 3D Navigation, adding a logo to that shape caused the logo to disappear. This issue affected the visual representation of tilted shapes logo and prevented users from viewing the configured logo as expected.
### Fix in Version 13.7
The issue has been resolved in Version **13.7**. Users can now add logos to tilted shapes without causing the logo to disappear.
This fix improves the consistency of shape rendering and allows logos to be displayed on tilted shapes as expected.
## 2. Improvement: Automatic Label Dimensions and Coordinates
### Previous Behavior
Previously, users had to manually enter the label's box width, height, and box center coordinates while configuring labels for individual shapes. This required additional configuration and made label positioning more time-consuming.
### Improvement in Version 13.7
In Version **13.7**, the Shape Label configuration process has been improved to automatically detect the required dimensions and coordinates.
When users navigate to
**Modules -> Navigation -> Shape -> Label**
and click on a shape, the system automatically populates the following values:
| Setting | Description |
|---|---|
| **Box Width** | Automatically detects and sets the label box width based on the selected shape. |
| **Box Height** | Automatically detects and sets the label box height based on the selected shape. |
| **Box Center Coordinate (X, Y)** | Automatically populates the X and Y coordinates for positioning the label box. |
### Benefits
- Reduces manual data entry during label configuration.
- Simplifies the process of positioning labels on shapes.
- Helps users configure labels more efficiently.
- Improves the overall usability of the Shape Label feature.
## Result
Version **13.7** improves the 3D Navigation experience by resolving the shape visibility issue when adding logos to tilted shapes and introducing automatic detection of label dimensions and center coordinates. These changes make Shape Label configuration more convenient and improve the consistency of shape display.
# VirtuKiosk - Version 13.8
# Overview
Version **13.8** includes a bug fix and a UI enhancement for **3D Navigation**. This update addresses an application crash issue and introduces the ability to customize the background color of the 3D Navigation layout.
## Bug Fixes and Improvements
### 1. Bug Fix: Application Crash
**Issue:**
Previously, the application was crashing during usage, affecting the stability of the 3D Navigation experience.
**Fix in Version 13.8:**
The application crash issue has been fixed, improving application stability and providing a smoother user experience.
### 2. UI Enhancement: Customizable 3D Navigation Background
**Previous Behavior:**
Previously, the background behind the 3D Navigation layout was displayed only in **blue**, with no option to customize it according to user requirements.
**Improvement in Version 13.8:**
Users can now customize the background color behind the 3D Navigation layout according to their preferences and project requirements.
**Configuration Option:** Sky Box Color
**Access Path:**
**Left Menu Bar → Modules → Navigation → Config → Sky Box Color**
The **Sky Box Color** option allows users to customize the background color displayed behind the 3D Navigation layout.
This enhancement provides greater flexibility in UI customization and helps users create a more consistent visual appearance for their Kiosk.
## Result
Version **13.8** improves application stability by fixing the crash issue and enhances 3D Navigation customization by allowing users to change the layout's background color using the **Sky Box Color** option instead of using only the default blue background.
# VirtuKiosk - Version 13.9
# Release Notes – Version 13.11
## Overview
Version **13.11** includes UI improvements in the newly introduced Coupon Code and Voucher feature, along with several bug fixes.
This release also follows the Shape Label functionality introduced in Version 13.9, which improved shape identification and logo customization in 3D Navigation.
## 1. UI Improvements – Coupon Code and Voucher
### Overview
UI improvements have been implemented in the Coupon Code and Voucher feature introduced in Version 13.10.
These changes aim to improve the user interface and make the coupon and voucher application process more user-friendly.
### Feature Access
**Access Path:**
`Modules → Order → Coupon`
**Enable Coupon Code:**
`Modules → Order Settings → Enable Coupon Code`
**Note:** The Enable Coupon Code setting must be activated to display the coupon and voucher option during the Kiosk ordering process.
## 2. Bug Fixes
### Overview
Several existing bugs have been identified and fixed in Version 13.11.
These fixes improve application stability and the overall user experience.
## 3. Existing Feature Reference – Shape Label (Version 13.9)
### Overview
Version **13.9** introduced the Shape Label feature in 3D Navigation. This feature allows users to display shape names and logos on the front of shapes.
### 3.1 Automatic Shape Name Display
- Shape names are automatically displayed on the front of their respective shapes.
- Users can identify shapes directly through their visible labels.
- This makes it easier to distinguish between different shapes in the 3D Navigation layout.
### 3.2 Logo Resizing
- Users can resize logos displayed on shapes.
- Logo dimensions can be adjusted according to the shape and layout requirements.
### 3.3 Label Configuration Options
The Label configuration provides the following options:
| Configuration | Description |
|---|---|
| Mode | Select the label display mode. |
| Text Color | Configure the label text color. |
| Text Size | Adjust the label text size. |
| Text Border Color | Configure the text border color. |
| Text Border Size | Adjust the text border size. |
| Box Center Coordinates | Set the X and Y coordinates of the label. |
| Box Rotation | Adjust the label rotation. |
| Box Height | Set the label height. |
| Box Width | Set the label width. |
## Result
Version **13.11** focuses on:
- UI improvements in the Coupon Code and Voucher feature.
- Fixes for several existing bugs.
- Continued improvements to the overall application experience.
**Note:** The Shape Label functionality described above was introduced in Version 13.9 and is included here as a feature reference, not as a new Version 13.11 change.
# VirtuKiosk - Version 13.10
# Overview
Version **13.10** introduces an important bug fix in **3D Navigation** and a new **Coupon Code and Voucher** feature in the Kiosk ordering system.
This update allows animated GLB models to display correctly in 3D Navigation and enables users to apply coupon codes or vouchers while placing orders.
## 1. Bug Fix: Animated GLB Files Not Displaying in 3D Navigation
### Issue
Previously, in 3D Navigation, normal GLB files were loading and displaying correctly, but **animated GLB files were not displaying as expected**.
This issue affected the visibility of animated 3D models on the Kiosk.
### Fix in Version 13.10
The issue has been fixed in Version **13.10**. Animated GLB files can now be displayed in 3D Navigation along with normal GLB models.
This improvement enhances GLB model compatibility and provides a better 3D Navigation experience.
## 2. New Feature: Coupon Code and Voucher in Kiosk
### Overview
Version **13.10** introduces a new **Coupon Engine** feature in the Kiosk ordering system.
With this feature, users can apply a valid coupon code or voucher while placing an order to avail the applicable discount.
### Step 1: Enable Coupon Code
**Access Path:**
**Modules → Order Settings → Enable Coupon Code**
> **IMPORTANT:** This setting must be enabled before using the Coupon Code feature. If **Enable Coupon Code** is not activated, users will not see the option to apply a coupon code or voucher during the ordering process.
### Step 2: Manage Coupons
**Access Path:**
**Modules → Order → Coupon**
The **Coupon** section allows administrators to access and manage coupon configurations for the Kiosk ordering system.
### Step 3: Apply Coupon Code or Voucher
Once the coupon code feature is enabled, users can:
1. Add products to their cart.
2. Proceed with the order.
3. Enter their coupon code or voucher.
4. Apply the code during the ordering process.
The applicable discount will be processed according to the configured coupon or voucher rules.
### Detailed Documentation Reference
If you want to learn more about how to configure and apply **Coupon Codes and Vouchers**, please refer to the separate detailed documentation for step-by-step instructions.
**Reference Documentation:-**
[Detailed Knowledge of Coupon Code](https://docs.virtubox.io/books/backend-a1/chapter/modules)
## Result
Version **13.10** enhances the Kiosk experience with two major updates:
- **3D Navigation:** Fixed the issue preventing animated GLB files from displaying correctly.
- **Coupon Code and Voucher:** Introduced a new feature that allows users to apply coupon codes or vouchers while placing orders.
These improvements enhance 3D Navigation compatibility and provide additional flexibility in the Kiosk ordering process.
# VirtuKiosk - Version 13.11
# Overview
Version **13.11** introduces UI improvements to the newly released **Coupon Code and Voucher** feature, along with several bug fixes.
This update focuses on improving the user interface and enhancing the overall stability of the application.
## 1. UI Improvements – Coupon Code and Voucher
### Overview
Some UI changes have been implemented in the new **Coupon Code and Voucher** feature introduced in Version 13.10.
These improvements aim to enhance the user interface and provide a better experience while using the coupon code and voucher functionality.
## 2. Bug Fixes
### Overview
Several existing bugs have been identified and fixed in Version **13.11** to improve application stability and functionality.
## Result
Version **13.11** includes the following improvements:
- UI enhancements in the Coupon Code and Voucher feature.
- Fixes for several existing bugs.
- Overall improvements to the application experience and stability.
# Printer Integration
# PrintHand Setup & Configuration
# Overview
**PrintHand** is a mobile and desktop application that allows users to print documents, photos, emails, and other files directly from their devices to a wide range of printers. It supports both wired and wireless printing methods, making it a convenient solution for printing without relying on a PC.
This guide explains how to install, configure, and troubleshoot the PrintHand application on a VirtuBox Kiosk.
---
# Prerequisites
Before starting the installation, ensure the following requirements are met:
- Android Box is connected to the Kiosk.
- Kiosk is configured and ready.
- A valid Kiosk Account is available.
- Printer Integration is enabled.
- Printer License is assigned.
- Printer is connected.
- USB cable is available.
- **No Google Account should be logged into the Android Box.**
---
# Check Google Account
Before installing PrintHand, verify that no Google Account is signed in.
## Steps
1. Go to the **Home Screen**.
2. Open **Settings**.
3. Navigate to **Accounts & Sign In**.
4. Check whether any Google Account is logged in.
> **Note**
>
> - If no account is logged in, continue with the installation.
> - If a Google Account is logged in, remove it first by following the FAQ section.
---
# Download PrintHand
Download the PrintHand application from the following URL:
[https://www.virtubox.io/download](https://docs.virtubox.io/attachments/1)
After downloading, install the application.
---
# Install & Configure PrintHand
Follow the steps below to configure PrintHand.
- Step 1
Open the **PrintHand** application.
- Step 2
Tap the **three-dot menu** located in the top-right corner.
- Step 3
Select **Settings**.
- Step 4
Open **Libraries**.
- Step 5
Download **all available libraries**.
> Wait until all libraries have been downloaded successfully.
- Step 6
Press the **Back** button.
- Step 7
Press **Back** once again to return to the PrintHand home screen.
- Step 8
Tap **Add Printer**.
- Step 9
Select **Printer Setup Wizard**.
- Step 10
Connect the printer to the Android Box using a USB cable.
- Step 12
Click **Next**.
- Step 13
When the printer is detected, select:
**1 Printer Found**
Wait until the processing is completed.
- Step 14
Scroll down and select **Print Test**.
- Step 15
Click **Next**.
Wait until processing completes.
- Step 16
Print the Test Page.
- Step 17
Verify that the Test Page has been printed successfully.
- Step 18
Click **Next**.
> **Congratulations!** 🎉
>
> PrintHand has been configured successfully.
---
# Prepare a Kiosk for PrintHand
Before using PrintHand, prepare your Kiosk using the following steps.
- Step 1
Connect the Android Box to the Kiosk using:
1. HDMI Cable
2. Touch USB Cable
3. Power Adapter
- Step 2
Install the Kiosk Application.
- Step 3
Add the Kiosk Account.
- Step 4
Navigate to:
**Kiosk Account → Kiosk Integration → Printer**
Enable **Printer Integration**.
- Step 5
Assign a **Printer License** to the Kiosk.
> Contact **Ashish** to obtain a Printer License.
- Step 6
Click **Update Kiosk**.
Your Kiosk is now ready to use PrintHand.
---
# Configure Paper Size (EPSON PM-520)
To enable borderless printing:
1. Open **PrintHand**.
2. Tap the **three-dot menu**.
3. Select **Settings**.
4. Open **Manage Printer**.
5. Select the connected printer.
6. Open **Paper**.
7. Select:
**10 × 15 cm (4 × 6 in) Borderless**
---
# Supported Printers
Before using PrintHand, verify that your printer is supported.
Visit:
[https://printhand.com/supported_printers.php](https://docs.virtubox.io/attachments/2)
Frequently Asked Questions (FAQ)
---
## Q1. What should I do if the Test Print is not generated after Step 18?
If the Test Print is not generated after completing Step 18, follow these steps:
1. Go to the **Home Screen** of the Kiosk.
2. Open **Settings**.
3. Navigate to **Apps**.
4. Locate and open the **PrintHand** application.
5. Tap **Clear Data**, then **Force Stop**.
6. Reopen the **PrintHand** application.
7. Repeat the installation process starting from **Step 2 of the PrintHand Installation & Configuration** section.
---
## Q2. What should I do if a Google Account is logged in?
PrintHand should be configured **without any Google Account** logged into the Android Box.
To remove the account:
1. Go to the **Home Screen**.
2. Open **Settings**.
3. Navigate to **Accounts & Sign In**.
4. Select the **Google Account**.
5. Tap **Remove Account**.
6. Restart the installation process from **Step 1 of the PrintHand Installation & Configuration** section.
---
## Q3. How do I prepare a Kiosk before using the PrintHand application?
Before installing PrintHand, ensure that the Kiosk is properly configured.
1. Connect the **Android Box** to the Kiosk using:
- HDMI Cable
- Touch USB Cable
- Power Adapter
2. Install the **Kiosk Application**.
3. Add the **Kiosk Account**.
4. Navigate to:
**Kiosk Account → Kiosk Integration → Printer**
5. Enable **Printer Integration**.
6. Assign a **Printer License** to the Kiosk (Contact **Ashish** for the license).
7. Click **Update Kiosk**.
The Kiosk is now ready for PrintHand installation.
---
## Q4. How do I configure the paper size for EPSON PM-520 Borderless Printing?
To configure borderless printing:
1. Open the **PrintHand** application.
2. Tap the **three-dot menu** in the top-right corner.
3. Open **Settings**.
4. Select **Manage Printer**.
5. Choose the connected printer.
6. Select **Paper**.
7. Choose **10 × 15 cm (4 × 6 in) Borderless**.
This will enable borderless printing for the EPSON PM-520 printer.
# Troubleshooting Checklist
Before raising a support ticket, verify the following:
- Android Box is powered on.
- Printer is connected via USB.
- Printer License is assigned.
- Printer Integration is enabled.
- All PrintHand libraries are downloaded.
- No Google Account is logged in.
- Printer is supported by PrintHand.
- Test Print has been attempted.
---
# Notes
> **Important**
>
> - Always download all PrintHand libraries before configuring the printer.
> - Do not log in with a Google Account while using PrintHand.
> - If you clear PrintHand data, repeat the configuration process.
> - Verify printer compatibility before installation.
# BluPrints Printer -- ViruKiosk USB Testing & Troubleshooting Guide
# Overview
This document covers the USB connection, printer detection, printing, test cases, and troubleshooting procedure for the **BluPrints printer** connected to a VirtuKiosk Android device.
The purpose of this guide is to:
- Verify that the printer is detected correctly.
- Identify USB connection problems.
- Reproduce the intermittent printer-disconnection issue.
- Provide a simple recovery procedure.
- Help anyone troubleshoot and resolve the printer connection issue.
---
# Printer Information
| Item | Value |
|---|---|
| Printer | **BluPrints** |
| Manufacturer | **AMSPL** |
| USB VID | **0416** |
| USB PID | **5011** |
| USB Type | USB Printer |
---
# Test Cases
| Test Case ID | Test Case | Steps / Scenario | Expected Result | Actual Result | Status |
|---|---|---|---|---|---|
| **T01** | Normal Printer Connection | Turn ON Kiosk → Turn ON Printer → Connect USB cable | BluPrints should be detected | BluPrints detected successfully | **PASS** |
| **T02** | Printer Power Cycle | Keep USB connected → Turn Printer OFF → Wait → Turn Printer ON | Printer should reconnect automatically | Printer re-enumerated successfully | **PASS** |
| **T03** | Kiosk Reboot With Printer Connected | Keep Printer ON + USB connected → Reboot Kiosk | Printer should be detected after Android boots | BluPrints detected successfully | **PASS** |
| **T04** | USB Disconnect/Reconnect While Printer Remains ON | Disconnect USB → Reconnect USB without turning OFF printer | Printer should be detected again | USB enumeration failed with `error -71` | **FAIL** |
| **T05** | Printer-Side USB Disconnect/Reconnect | Disconnect USB from printer side → Reconnect while printer remains ON | Printer should be detected | USB enumeration failed with `error -71` | **FAIL** |
| **T06** | Printer Power Reset + USB Reconnect | Printer OFF → Remove USB → Printer ON → Reconnect USB | Printer should be detected | BluPrints detected successfully | **PASS** |
| **T07** | Printer Startup Wait – 15 Seconds | Printer OFF → Remove USB → Printer ON → Wait 15 sec → Connect USB | Printer should be detected | BluPrints detected successfully | **PASS** |
| **T08** | Printer Fully ON Before USB Connection | Printer ON → Wait 30 sec → Connect USB | Printer should be detected | BluPrints detected successfully | **PASS** |
| **T09** | Kiosk Cold Power Cycle | Printer ON + USB connected → Turn Kiosk OFF → Turn Kiosk ON | Printer should be detected after boot | BluPrints detected successfully | **PASS** |
| **T10** | VirtuKiosk Application Restart | Printer connected → Close VirtuKiosk → Reopen VirtuKiosk | Application should detect already-connected printer | BluPrints detected successfully | **PASS** |
| **T11** | Actual Printing | Connect printer → Open VirtuKiosk → Click printer button → Print test value | Printer should print successfully | Test value printed successfully | **PASS** |
| **T12** | USB Disconnect/Reconnect While VirtuKiosk Is Running | Keep VirtuKiosk open → Disconnect USB → Reconnect USB | Printer should reconnect | USB enumeration failed with `error -71` | **FAIL** |
| **T13** | Replacement USB Data Cable | Replace USB data cable → Repeat printer connection test | Printer should connect if original cable is faulty | Same failure pattern occurred | **FAIL** |
| **T14** | Printer Disconnect Recovery Procedure | Remove USB cable from both sides → Printer OFF → Printer ON → Wait 10 sec → Reconnect USB | Printer should reconnect | BluPrints connected successfully | **PASS** |
---
# Normal Printer Connection
Follow these steps when connecting the printer normally.
### Steps
1. Turn **ON the Kiosk**.
2. Turn **ON the printer**.
3. Wait until the printer is fully powered.
4. Connect the USB/data cable to the **printer**.
5. Connect the other end of the USB/data cable to the **Kiosk**.
6. Wait approximately **5–10 seconds**.
7. Open/check **VirtuKiosk**.
8. Verify that **BluPrints / Printer Connected** is displayed.
9. Perform a test print.
---
# Main Failure
The main failure observed during testing occurs when the printer is **powered ON** and the USB/data cable is disconnected and reconnected while the Kiosk remains powered ON.
## Failure Scenario
1. Kiosk ON.
2. Printer ON.
3. VirtuKiosk Running.
4. USB Connected.
5. Disconnect USB Cable.
6. Reconnect USB Cable.
7. Printer is not Connectd.
## How to Fix
1. Remove USB Cable (connection between Kiosk and Printer) .
2. Turn Off Printer (wait 5-10 second).
3. Turn On printer (wait 5-10 second).
4. Reconnect USB (wait untill kiosk connect with USB printer).
5. Now check VirtuKiosk.
6. Perform Test print.
#### Notes
- In case of any failure, follow the guidelines above to reconnect the printer.
# Whatsapp Integration - Script Response
# Overview
A new **WhatsApp Integration** feature has been introduced in the Backend. This feature allows users to send **Script Responses** and supported files to WhatsApp using configured templates or file references.
---
## Accessing the Template
The **Template** option is available after creating a script and opening its **Script Info** section.
### Steps
1. Create/Add a new **Script**.
2. Open the **Script Info** section.
3. Click on the **Template** option.
4. The **Script Template** page will open.
---
### Script Template
The Script Template page contains the following sections:
- Configuration
- PDF Template
- SMS Template
- Email Template
---
### Configuration
The **Configuration** section provides a **Timezone** option.
##### Timezone
Users can:
1. Select the required timezone.
2. Click **Update** to save the selected timezone.
---
#### PDF Template
The **PDF Template** section allows users to create and configure PDF templates.
##### Add New PDF Template
1. Navigate to the **PDF Template** section.
2. Click **Add New**.
3. The **PDF Template** modal will open.
4. Enter the required **Template Title**.
5. Click **Add Template**.
##### Add PDF Template Modal
The modal contains:
| Field/Action | Description |
|---|---|
| Template Title | Used to define the name of the PDF template |
| Add Template | Creates the new PDF template |
| Close (×) | Closes the modal |
---
#### Script PDF Template
After creating the PDF template, the user is redirected to the **Script PDF Template** page.
The page contains the following sections:
- Template Information
- Placeholders
- PDF Template
- PDF Configuration
---
#### Template Information
The configured **Template Title** is displayed at the top of the page.
Example:
```text
Whatsapp Integration
```
#### Placeholders
The **Placeholders** section displays the dynamic values that can be used inside the PDF template.
##### Placeholder Categories
- Response
- System
##### Example
```text
[Name]
[Mobile]
[Company_Name]
[Designation]
```
These placeholders can be used to dynamically populate the template with the relevant script or system data.
---
#### PDF Template Editor
The **PDF Template** section provides the following tabs:
- View
- Edit
- Preview
##### View
The **View** tab displays the configured HTML content of the PDF template.
The template can contain:
- HTML
- CSS
- Images
- Dynamic placeholders
- External URLs
- Page-break configuration
##### Example
```html
```
---
#### PDF Configuration
The PDF template provides additional configuration options.
| Configuration | Description |
|---|---|
| BG Image URL | URL of the background image |
| BG Size | Controls how the background image is displayed |
| Lock Ratio | Maintains the aspect ratio |
| Width | Defines the PDF width |
| Height | Defines the PDF height |
| Paper | Defines the paper size |
| Save | Saves the configured PDF template |
##### BG Image URL
The user can provide a background image URL.
> **Recommended Image Dimension:** `794px × 1123px`
##### BG Size
Defines how the background image should fit within the PDF.
Example:
```text
Crop
```
##### Lock Ratio
When enabled, the aspect ratio between **Width** and **Height** is maintained.
##### Width and Height
Defines the dimensions of the PDF template.
##### Example
```text
Width : 210
Height : 297
```
##### Paper
Allows the user to select the required paper size.
##### Example
```text
A4
```
##### Save
Click **Save** to save the PDF template configuration.
---
#### WhatsApp Response Behaviour
The WhatsApp Integration supports sending the Script Response in different formats depending on whether a template is configured.
##### Template Configured
If a template has been added to the script, the **Script Response** will be sent through WhatsApp using the configured template.
The response will be generated in the configured template format.
##### Template Not Configured
If no template is configured for the script, the **Script Response** will be sent in **link format** instead of using a template.
##### Behaviour
```text
Template Available
↓
Send Response using Configured Template
Template Not Available
↓
Send Response as Link
```
---
#### File Publishing Requirement
- A file will be sent to WhatsApp **only after the file has been published**.
- If a file has not been published, it will **not** be sent through WhatsApp.
##### Flow
```text
File Created/Uploaded
↓
Publish File
↓
File Becomes Available
↓
Send File via WhatsApp
```
---
#### WhatsApp Eligibility
WhatsApp delivery is supported only when the recipient's mobile number uses the **Indian country code `+91`**.
If a country code other than `+91` is used, the WhatsApp message will **not be sent**.
##### Example
| Country Code | WhatsApp Delivery |
|---|---|
| `+91` | Supported |
| Any country code other than `+91` | Not Supported |
---
#### Sending Files Without a Template
Files can also be sent through WhatsApp without creating a PDF template.
If the user wants to send a file such as an **image, video, JPG, PNG, or PDF** directly through WhatsApp, the file must first be uploaded and published through the required module.
##### Steps
1. Navigate to the relevant **Module**.
2. Upload the required file.
3. Publish the uploaded file.
4. Obtain the file's **Unique Code**.
5. Add the Unique Code to the Script.
6. Execute/send the Script Response.
7. The file associated with that Unique Code will be sent through WhatsApp.
##### File Sending Flow
```text
Go to Module
↓
Upload File
↓
Publish File
↓
Get File_id
↓
Add file_id to Script
↓
Execute Script
↓
WhatsApp
↓
Configured File is Sent
```
**Important**:-
The file sent through WhatsApp will be the same file associated with the file_id added to the script.
---
##### Supported File Formats
The following file formats are currently supported for WhatsApp file delivery:
- mp4
- jpg
- png
- pdf
---
##### Multi-File Support
**Multi-file support is currently not available.**
At present, the integration does not support sending multiple files together as part of the same WhatsApp response.
---
##### Change Response Format
To change the format/prefix used for the Script Response:
1. Navigate to **Settings**.
2. Open **Codes**.
3. Locate **Script Response Code Prefix**.
4. Update the required prefix.
5. Save the configuration.
###### How to Access
```text
Settings
↓
Codes
↓
Script Response Code Prefix
↓
Update Prefix
↓
Save
```
The updated prefix will be used for the Script Response accordingly.
---
#### WhatsApp Integration Flow
```text
Create Script
↓
Open Script Info
↓
Select Template
↓
Script Template
↓
Configure PDF Template (Optional)
↓
Save Template
↓
Generate Script Response
↓
Check Template Configuration
↓
┌──────────────────────────────┐
│ Template Configured? │
└──────────────┬───────────────┘
│
┌──────┴──────┐
│ │
Yes No
│ │
↓ ↓
Configured Link Format
Template Response
│ │
└──────┬──────┘
↓
Check WhatsApp Eligibility
↓
Country Code must be +91
↓
Send via WhatsApp
```
# 3D Navigation
# Overview
The **3D Navigation** feature allows users to create and configure an interactive 3D navigation experience using maps, custom shapes, products, kiosks, logos, and 3D model files such as **GLB** files.
To configure 3D Navigation successfully, the setup must be completed in the correct sequence:
## 3D Navigation Setup Flow:
**Modules → Navigation → Config → Change Map Mode from 2D to 3D**
↓
**Modules → Navigation → Add Map**
↓
**Create / Configure Shapes**
↓
**Upload and Select Logo / GLB Files**
↓
**Configure 3D Map Settings**
↓
**Map Products**
↓
**Map Kiosk**
↓
**3D Navigation Ready**
> **Important:** Before starting the **3D Navigation** configuration, the map must be changed from **2D to 3D** through **Settings**. If the map remains in **2D mode**, the **3D Navigation** will not be displayed correctly.
---
### 1. Prerequisites
Before configuring 3D Navigation, make sure the following are available:
- A map is available in the system.
- The map mode is changed from 2D to 3D.
- Required Logo files are available.
- Required GLB files are available.
- Products that need to be displayed on the map are available.
- A kiosk is available for mapping.
- Required map shapes have been created and configured.
---
### 2. Change Map Mode from 2D to 3D
The first and most important step is to change the map mode from **2D to 3D**.
### Navigation Path
```text
Settings → Map Configuration → Map Mode
```
Change the map mode from:
**2D**
to:
**3D**
### Important
The map must be configured in **3D mode before continuing with the Navigation configuration**.
If the map remains in **2D mode**:
- 3D shapes may not be displayed correctly.
- 3D models may not appear as expected.
- The 3D Navigation experience will not work properly.
> **Note:** Always verify the **Map Mode** before testing the final **3D Navigation** setup.
### 3. Open Navigation Module
After changing the map mode to **3D**, open the **Navigation** module.
### Navigation Path
```text
Modules → Navigation
```
The **Navigation** section contains multiple configuration areas, including:
- **Map**
- **Product**
- **Kiosk**
- **Connector**
- **Facility**
- **Track**
- **Shape**
- **Config**
### 4. Add a Map
The first step inside the **Navigation** module is to add the map on which the **3D Navigation** will be configured.
#### Navigation Path
```text
Modules → Navigation → Map → Add Map
```
Click **Add Map** to add the required map.
After adding the map, it will be available in the **Map** list.
#### Map Status
A map can have different statuses, such as:
- **Published**
- **Unpublished**
For final navigation usage, ensure that the required map is properly configured and **Published**.
### 5. Create Shapes
Shapes are used to define the areas that need to be represented in the **3D Navigation** environment.
For example, shapes can represent:
- **Rooms**
- **Stores**
- **Counters**
- **Facilities**
- **Zones**
- **Navigation Areas**
- **Other Custom Map Regions**
### Navigation Path
```text
Modules → Navigation → Shape
```
Shapes can be created and managed from the **Shape** section.
### 6. Create a Shape Using Map Layout
After opening the **Shape** configuration, the **Map Layout** section is available.
The **Map Layout** provides the following options:
- **Draw**
- **Close Shape**
- **Undo**
- **Duplicate**
These options are used to create and modify the shape.
---
#### 6.1 Draw
The **Draw** option is used to create the shape directly on the map.
### Steps
1. Open the required map.
2. Select **Draw**.
3. Select points on the map to define the shape.
4. Continue adding points in anticlockwise direction until the required area is covered.
5. Select **Close Shape** to complete the shape.
The shape is created using multiple coordinate points.
#### 6.2 Close Shape
After creating the required points, use:
```text
Close Shape
```
- This closes the selected points and creates the **final shape**.
- A closed shape is required when defining a complete area for 3D representation.
#### 6.3 Undo
The **Undo** option can be used when an incorrect point or drawing action has been performed.
Use it to revert the latest drawing action while creating the shape.
#### 6.4 Duplicate
- The **Duplicate** option allows an existing shape to be copied.
- This is useful when multiple shapes have similar configurations.
- Instead of creating every shape from the beginning:
```text
Existing Shape
↓
Duplicate
↓
Edit Name / Coordinates / Configuration
↓
New Shape
```
This can reduce the time required to create multiple similar shapes.
#### 7. Shape Name and Configuration
After creating a shape, the shape can be selected for editing.
The **Shape Configuration** contains information such as:
- **Title denotes the name of that shape.**
- **Logo denotes the shape logo**
- **Pin 3D used to add glb files.**
- **3D Pin Rotation used to rotate the pins.**
- **3D Pin Scale used to manage the size**
- **Active Color**
- **Inactive Color**
- **Active Height**
- **Inactive Height**
### Example
```text
Editing: Shape 24
```
The **Shape Title** can be changed according to the actual location or purpose of the shape.
### Example
The default shape name:
```text
Shape 24
```
can be renamed to:
```text
ATM Zone
```
or:
```text
Food Court
```
or:
```text
Gate Area
```
depending on the use case.
#### 8. Configure Shape Logo
A logo can be assigned to a shape.
The **Logo** field allows a previously uploaded image file to be selected.
##### Example
```text
Logo: ATM.png [png] [image]
```
##### Important
The required logo must first be uploaded or made available through:
```text
Modules → Files
```
After the file is available, it can be selected from the **Logo** dropdown in the **Shape Configuration**.
#### 9. Upload GLB Files
**3D Navigation** supports **GLB files** for displaying 3D models.
Before selecting a GLB file in the **Navigation** configuration, the file must first be available in the **Files** module.
##### Navigation Path
```text
Modules → Files
```
##### Steps
1. Open **Modules**.
2. Select **Files**.
3. Upload the required **GLB file**.
4. Make sure the file is available in the file list.
5. Return to **Modules → Navigation**.
6. Select the required **Shape/Configuration**.
7. Select the uploaded **GLB file** where required.
##### Important
> **GLB files cannot be selected directly unless they are first available through `Modules → Files`.**
The same approach can be followed for required **image/logo files**.
# 10. Configure 3D Shape Settings
After creating the shape, open the **Config** section.
The **Shape Configuration** provides options for controlling how the shape is displayed in the **3D environment**.
### Main Configuration Fields
| Field | Description |
|---|---|
| **Title** | Defines the name of the shape |
| **Logo** | Selects the logo/image associated with the shape |
| **Pin 3D** | Selects the 3D pin/model |
| **3D Pin Rotation** | Controls the rotation of the 3D pin |
| **3D Pin Scale** | Controls the scale/size of the 3D pin |
| **Active Color** | Defines the color when the shape is active |
| **Inactive Color** | Defines the color when the shape is inactive |
| **Active Height** | Defines the height of the active shape |
| **Inactive Height** | Defines the height of the inactive shape |
### Apply Configuration
After making the required changes, click:
```text
Update
```
to apply and save the **Shape Configuration**.
#### 11. Configure Shape Coordinates
The **Coordinate** section allows the exact coordinates of the shape points to be edited.
The interface provides points such as:
```text
P1
P2
P3
P4
```
Each point contains its respective:
```text
X Coordinate
Y Coordinate
```
##### Example
```text
P1 X: 1225 Y: 1070
P2 X: 1276 Y: 1071
P3 X: 1281 Y: 1000
P4 X: 1224 Y: 1000
```
##### Coordinate Editing
Coordinates can be edited manually when precise positioning is required.
##### Steps
1. Open the required **Shape**.
2. Select **Coordinate**.
3. Select the point that needs to be changed.
4. Edit the **X** and **Y** values.
5. Click **Update**.
This allows the shape to be accurately positioned according to the map layout.
#### 12. Shape Coordinate Workflow
The complete shape creation workflow can be represented as:
```text
Open Shape
↓
Select Draw
↓
Add Points
↓
Close Shape
↓
Shape Created
↓
Open Coordinate
↓
Edit X / Y if Required
↓
Update
```
If another similar shape is required:
```text
Existing Shape
↓
Duplicate
↓
Edit Title
↓
Edit Coordinates
↓
Update
```
#### 13. Configure the 3D Map
After creating the required shapes, configure the main **3D Map** settings.
##### Navigation Path
```text
Modules → Navigation → Config
```
The **Config** section contains settings for the **Navigation Map** and its **3D environment**.
---
#### 14. 3D Configuration
The **3D Configuration** section controls the main **3D Navigation** behavior.
##### Configuration Fields
| Field | Description |
|---|---|
| **Map Mode** | Defines whether the map operates in **2D** or **3D** mode |
| **Map Footstep Modal** | Selects the footstep modal configuration |
| **Footstep Rotation** | Controls the rotation of the navigation footstep |
| **Footstep Scale** | Controls the size/scale of the footstep |
| **Active Shape Color** | Defines the color of active shapes |
| **Inactive Shape Color** | Defines the color of inactive shapes |
| **Active Shape Height** | Defines the height of active shapes |
| **Inactive Shape Height** | Defines the height of inactive shapes |
##### Map Mode
For **3D Navigation**, the **Map Mode** must be set to:
```text
3D
```
---
#### 15. Active and Inactive Shape Configuration
The **3D Configuration** provides separate settings for **active** and **inactive** shapes.
##### Active Shape
The **Active Shape** configuration controls how a selected or active navigation area is displayed.
Example settings:
```text
Active Shape Color
Active Shape Height
```
##### Inactive Shape
The **Inactive Shape** configuration controls how non-selected areas are displayed.
Example settings:
```text
Inactive Shape Color
Inactive Shape Height
```
This allows active and inactive areas to have different visual representations in the **3D environment**.
#### Save 3D Configuration
After completing the configuration, click:
```text
Save
```
Always verify that the changes are saved before proceeding to the next configuration stage.
# Map Dynamic QR
# Overview
The **Map Navigation QR** configuration is used to place a **Dynamic Map QR** at a specific position on a background image and control the map and navigation movement within a defined segment.
The configuration primarily uses:
- **Background Image**
- **Width**
- **Height**
- **Padding**
- **Map (cx, cy)**
- **Map Navigation (cx, cy)**
- **Vertical (cx, cy)**
Correct configuration of these values ensures that the Dynamic Map QR, map, and navigation elements are displayed at the required position.
---
## Background Image
The **Background Image** is the image used as the base for the Map Navigation interface.
Any image configured through the **Modules** section can be used as the background image. The configured image will be displayed in the Map Navigation interface.
### Background Image Behaviour
The image configured in the relevant module is displayed as the background image for Map Navigation.
```text
Modules
↓
Configured Image
↓
Map Navigation
↓
Background Image
```
## Width and Height
The **Width** and **Height** values define the dimensions of the background image used for Map Navigation configuration.
The Width and Height should correspond to the actual dimensions of the background image.
### Width
**Width** represents the horizontal dimension of the background image.
For example, if the background image width is `1000 px`:
```text
Width = 1000
```
### Height
**Height** represents the vertical dimension of the background image.
For example, if the background image height is `600 px`:
```text
Height = 600
```
### Example
If the background image dimensions are:
```text
Width = 1000 px
Height = 600 px
```
> **Important:** The Width and Height should match the actual dimensions of the background image for accurate coordinate and padding calculations.
# Coordinate System
Coordinates are used to identify the exact position of an element within the background image.
Coordinates are represented in the following format:
```text
(X, Y)
```
Where:
- **X** represents the horizontal position.
- **Y** represents the vertical position.
For example:
```text
(200, 400)
```
means:
```text
X = 200
Y = 400
(0,0)
┌───────────────────────────────→ X
│
│
│
│
↓
Y
```
# Dynamic Map QR
The **Dynamic Map QR** is placed at a specific position inside the background image.
To position the QR accurately, its coordinates must first be identified from the background image.
The QR position can be identified using two main points:
- **Top-Left Coordinate**
- **Bottom-Right Coordinate**
For example:
```text
Top-Left = (200, 400)
Bottom-Right = (300, 450)
```
These coordinates are then used to calculate the required padding values.
---
# Padding
**Padding** is used to position the Dynamic Map QR correctly inside the background image.
The padding configuration consists of:
- **Padding Left**
- **Padding Top**
- **Padding Right**
- **Padding Bottom**
The padding values are calculated using the QR coordinates and the background image dimensions.
---
## Padding Left
**Padding Left** represents the horizontal distance between the left edge of the background image and the left edge of the Dynamic Map QR.
The **X-coordinate of the QR's left side** is used as the Padding Left value.
### Formula
```text
Padding Left = QR Left X Coordinate
```
### Example
If the QR starts at:
```text
X = 200
Y = 400
Then:
Padding Left = 200
```
## Padding Top
**Padding Top** represents the vertical distance between the top edge of the background image and the top edge of the Dynamic Map QR.
The **Y-coordinate of the QR's top side** is used as the Padding Top value.
### Formula
```text
Padding Top = QR Top Y Coordinate
```
### Example
If the QR starts at:
```text
X = 200
Y = 400
Then
Padding Top = 400
```
## Padding Right
**Padding Right** represents the horizontal distance between the right edge of the Dynamic Map QR and the right edge of the background image.
To calculate Padding Right, subtract the QR's **right-side X-coordinate** from the total background image width.
### Formula
```text
Padding Right = Background Image Width - QR Right X Coordinate
```
**Example**
```text
Suppose:
Background Image Width = 1000 px
QR Right X Coordinate = 300
Then:
Padding Right = 1000 - 300
Padding Right = 700
Therefore:
Padding Right = 700
```
## Padding Bottom
**Padding Bottom** represents the vertical distance between the bottom edge of the Dynamic Map QR and the bottom edge of the background image.
To calculate Padding Bottom, subtract the QR's **bottom-side Y-coordinate** from the total background image height.
### Formula
```text
Padding Bottom = Background Image Height - QR Bottom Y Coordinate
```
**Example**
```
Suppose:
Background Image Height = 600 px
QR Bottom Y Coordinate = 450
Then:
Padding Bottom = 600 - 450
Padding Bottom = 150
Therefore:
Padding Bottom = 150
```
# Complete Padding Example
Suppose the background image dimensions are:
```text
Width = 1000 px
Height = 600 px
```
The Dynamic Map QR coordinates are:
```text
Top-Left = (200, 400)
Bottom-Right = (300, 450)
```
The padding values will be calculated as follows:
### Padding Left
```text
Padding Left = 200
```
### Padding Top
```text
Padding Top = 400
```
### Padding Right
```
Padding Right = 1000 - 300
Padding Right = 700
```
### Padding Bottom
```
Padding Bottom = 600 - 450
Padding Bottom = 150
```
### Final Padding Configuration
```
Padding Left = 200
Padding Top = 400
Padding Right = 700
Padding Bottom = 150
```
## Padding Calculation Summary
| Padding | Calculation |
| ------------------ | ------------------------------------------------ |
| **Padding Left** | QR Left X Coordinate |
| **Padding Top** | QR Top Y Coordinate |
| **Padding Right** | Background Image Width - QR Right X Coordinate |
| **Padding Bottom** | Background Image Height - QR Bottom Y Coordinate |
---
# Map (cx, cy)
The **Map (cx, cy)** configuration controls the movement and positioning of the complete map within the defined segment.
It is used when the entire map needs to be moved or positioned so that the required area of the map is displayed inside the segment.
The `(cx, cy)` values define the position or movement of the map.
Where:
```text
cx = Horizontal movement/position
cy = Vertical movement/position
```
**Example**
```
Map (cx, cy) = (500, 300)
Here:
cx = 500
cy = 300
```
The map will be positioned or moved according to these coordinate values while remaining within the defined segment.
### Purpose
**Map (cx, cy)** is used to control:
- The overall movement of the map.
- The position of the map within the segment.
- Which portion of the map should be visible.
- How far the map should move horizontally and vertically.
---
# Map Navigation (cx, cy)
The **Map Navigation (cx, cy)** configuration is used for the navigation movement that is displayed when the user clicks **Take Me There**.
When **Take Me There** is selected, the map moves along the navigation path and displays the navigation route.
The `(cx, cy)` values determine where the navigation should be positioned and displayed during this movement.
Where:
```text
cx = Horizontal navigation position
cy = Vertical navigation position
```
**Example**
```
Map Navigation (cx, cy) = (450, 250)
Here:
cx = 450
cy = 250
```
These values determine where the navigation view should be positioned within the defined navigation area.
### Purpose
**Map Navigation (cx, cy)** is used to control:
- Where the navigation is displayed.
- How the map is positioned during navigation.
- The visible area while moving through the navigation path.
- The position of the navigation view when using **Take Me There**.
---
# Vertical (cx, cy)
The **Vertical (cx, cy)** configuration is used when the map or navigation needs to be positioned or displayed vertically.
It determines the required position of the map/content when the vertical positioning is required.
Where:
```text
cx = Horizontal position
cy = Vertical position
```
**Example**
```
Vertical (cx, cy) = (300, 500)
Here:
cx = 300
cy = 500
```
These values determine the required vertical positioning of the map or navigation content.
### Purpose
**Vertical (cx, cy)** is used to control:
- Vertical positioning of the map.
- Positioning of content in a vertical layout.
- The visible area of the map in vertical navigation.
- Alignment of the map within the defined segment.
---
# Difference Between Map, Map Navigation and Vertical
| Configuration | Purpose |
| --------------------------- | ------------------------------------------------------------------------------------- |
| **Map (cx, cy)** | Controls the overall movement and positioning of the complete map within the segment. |
| **Map Navigation (cx, cy)** | Controls the positioning of the map/navigation view when using **Take Me There**. |
| **Vertical (cx, cy)** | Controls the positioning of the map/content for vertical display or movement. |
---
# Background Image and Module Configuration
The background image used in Map Navigation is obtained from the image configured in the relevant **Module**.
Any image added to the Modules section can be displayed as the background image.
For example:
```text
Module
↓
Add/Configure Image
↓
Image is displayed in Map Navigation
```
This means the Map Navigation background is not limited to a single fixed image. The image configured for the relevant module is used accordingly.
# Dynamic Map QR Placement Workflow
Follow the steps below to configure the Dynamic Map QR accurately:
1. Select the required background image.
2. Check the actual **Width** of the image.
3. Check the actual **Height** of the image.
4. Enter the image **Width** and **Height** in the configuration.
5. Identify the **Top-Left** coordinate of the Dynamic Map QR.
6. Identify the **Bottom-Right** coordinate of the Dynamic Map QR.
7. Set **Padding Left** using the QR's left X-coordinate.
8. Set **Padding Top** using the QR's top Y-coordinate.
9. Calculate **Padding Right** using the background image width.
10. Calculate **Padding Bottom** using the background image height.
11. Configure **Map (cx, cy)** according to the required map movement.
12. Configure **Map Navigation (cx, cy)** according to the required **Take Me There** navigation position.
13. Configure **Vertical (cx, cy)** when vertical positioning is required.
14. Save the configuration.
15. Verify the Dynamic Map QR and navigation position on the Map Navigation screen.
---
# Configuration Example
Assume the background image has the following dimensions:
```text
Width = 1000 px
Height = 600 px
```
The Dynamic Map QR has the following coordinates:
```
Top-Left = (200, 400)
Bottom-Right = (300, 450)
```
### Width and Height
```
Width = 1000
Height = 600
```
### Padding
```
Padding Left = 200
Padding Top = 400
Padding Right = 1000 - 300 = 700
Padding Bottom = 600 - 450 = 150
```
### Final Configuration
```
Width = 1000
Height = 600
Padding Left = 200
Padding Top = 400
Padding Right = 700
Padding Bottom = 150
```
Map positioning can then be configured according to the required movement:
```
Map (cx, cy) = (500, 300)
Map Navigation (cx, cy) = (450, 250)
Vertical (cx, cy) = (300, 500)
```
The (cx, cy) values are example values and should be configured according to the required map and navigation position.
**Configuration Flow**
```
Background Image
↓
Check Image Width & Height
↓
Identify QR Coordinates
↓
Calculate Padding
↓
Configure Dynamic Map QR
↓
Configure Map (cx, cy)
↓
Configure Map Navigation (cx, cy)
↓
Configure Vertical (cx, cy) if required
↓
Save Configuration
↓
Verify Map Navigation
```
### Important Notes:
- The Width and Height should match the actual dimensions of the background image.
- The QR coordinates should be identified from the actual background image.
- Padding Left is calculated from the QR's left X-coordinate.
- Padding Top is calculated from the QR's top Y-coordinate.
- Padding Right is calculated by subtracting the QR's right X-coordinate from the background image width.
- Padding Bottom is calculated by subtracting the QR's bottom Y-coordinate from the background image height.
- Map (cx, cy) controls the overall movement and positioning.
- Map Navigation (cx, cy) controls the map/navigation positioning during Take Me There navigation.
- Vertical (cx, cy) controls the positioning of the map/content when vertical positioning is required.
- Images configured through the Modules section are displayed as the corresponding background images in Map Navigation.
- Coordinate values should be checked carefully to ensure accurate QR placement and map positioning.
- Any change in the background image dimensions may require the Width, Height, and Padding values to be recalculated.
# Demo Account Prioritization
# Overview
To display an account at the top in the demo, update its **Catalog UID** and **Title**.
- The **Catalog UID** is used to prioritize the account.
## Access Path for Catalog uid:-
**Leftside bar -> VirtuWeb -> Catalog uid**
The **Title** determines whether the account appears in the **Horizontal** view, **Vertical** view, or both, based on the keywords mentioned in the title.
## Access Path for Catalog Title:-
- **Leftside Bar -> My App -> Title**
## 1. Procedure
### 1.1 Display an Account at the Top in Vertical View
1. Go to account's **Catalog UID**.
2. Add a prefix such as `1-` to the Catalog UID to prioritize the account.
**Example:- 1-demo-hash_value**
3. Edit the account's **Title** and include the keyword `Vertical`.
**Example:- account_title - Vertical**
5. Save the changes and verify the account's position in the demo.
### 1.2 Display an Account at the Top in Horizontal View
1. Go to the account's **Catalog UID**.
2. Add a prefix such as `1-` to the Catalog UID to prioritize the account.
**Example:- 1-demo-hash_value**
3. Edit the account's **Title** and include the keyword `Horizontal`.
**Example:- account_title - Horizontal**
4. Save the changes and verify the account's position in the demo.
### 1.3 Display the Same Account at the Top in Both Views
1. Navigate to the account's **Catalog UID**.
2. Add a prefix such as `1-` to the Catalog UID to prioritize the account.
**Example:- 1-demo-hash_value**
3. Edit the account's **Title** and include both keywords: `Horizontal` and `Vertical`.
**Example:- account_title - Vertical - horizontal**
4. Save the changes and verify the account's position in both views.
## 2. Important Notes
- Ensure that the appropriate keyword is included in the account title.
- Include both `Horizontal` and `Vertical` keywords when the same account needs to appear in both views.
- Save all changes before verifying the results in the demo.
- The `1-` prefix is an example of a priority value. Ensure that it follows the UID format supported by the system.